7 Dressing Aid Myths That Make Getting Dressed Harder

Last Updated: November 19, 2026
Quick Summary
No, dressing aids are not hard to use. Many people learn the basics in a short session, though the first week can feel clumsy. The trick is picking the right tool and practicing in the right order.
Tools that need fine motor control, like button hooks, are harder than tools that reduce bending.
Practice in short daily sessions of about ten minutes rather than one long weekend session.
Always sit to dress and keep a stable surface nearby to avoid falls.
Check grip, reach, stability, and size before buying any aid.
Pants Aid comes in three sizes, with custom sizing available on request.
Tired of the morning dressing struggle?
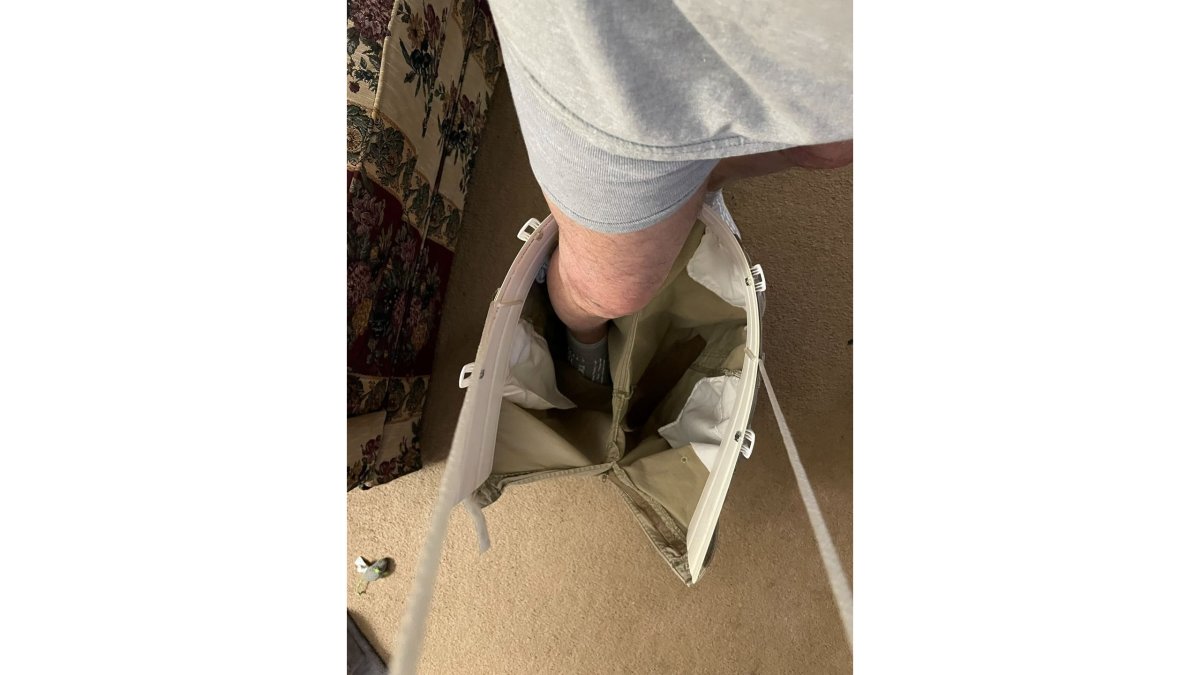
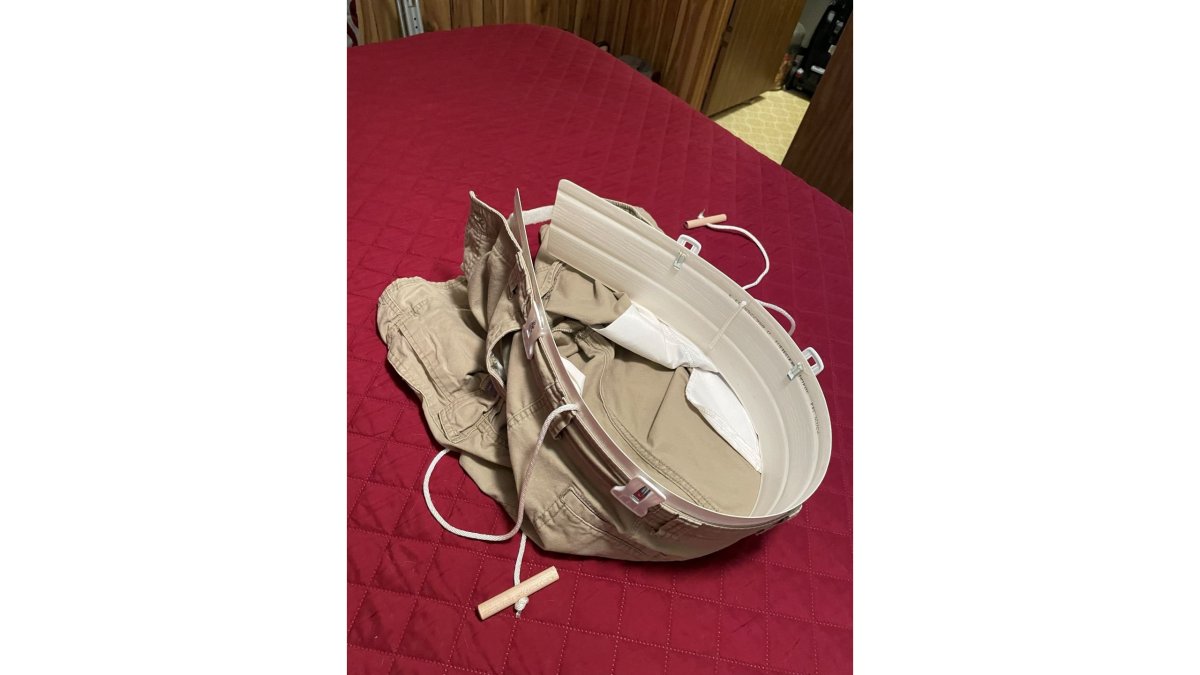
Pants Aid helps you step into pants without bending, in three sizes with custom sizing on request.
Table of Contents
So Is It Hard to Use Dressing Aids? The Honest Answer
No, dressing aids are not hard to use. Many people learn the basics in a short session. But the first week can feel clumsy, and that is where most people give up too soon.
It is a fair question. A dressing aid is only useful if it fits your hands, your body, and your daily routine.
Here is what most guides get wrong. They show a tool in perfect use and skip the learning curve. That sets you up to quit on day three.
Dressing aids are tools that help you put on clothes without bending, reaching, or twisting. They include dressing sticks, reachers, sock aids, button hooks, and lower-body aids.
The good news: the skills are simple. The trick is picking the right tool and practicing in the right order. Below, we break down exactly how each aid works, which ones are genuinely tricky, and how to build a two-week routine that sticks.
Dressing Stick How to Use It: A Step-by-Step Walkthrough
A dressing stick is a long handle with a hook on one end and a small notch or fork on the other. You use it to pull clothes up, push sleeves through, and grab fabric you cannot reach.
Here is the basic method:
Sit on a stable chair or the edge of the bed.
Hook the waistband or sleeve with the hook end.
Push or pull the fabric into place.
Use the fork end to guide straps or push a shoe on.

The first few tries feel awkward. That is normal. Your hands are learning a new pattern, not proving anything about your ability.
For the official step-by-step instructions that come with our tools, see our Directions For Use page and follow along while you practice.
How to Use a Dressing Stick to Put on Pants Without Bending
Putting on pants without bending comes down to one habit: bring the pants to your feet, not your feet to the pants. A dressing stick makes that possible.
william vanacore
Try this sequence:
Sit down and lay the pants on the floor in front of you.
Hook the waistband and lift the pants toward your feet.
Slide one foot in, then the other.
Use the stick to work the fabric up past your knees.
Stand with support and finish pulling them up.
The key is patience. Do not hurry. Rushing is how people lose balance.
If bending is your main limit, our guide on how to put on pants without bending walks through safer positioning and seated techniques in more detail.
How to Use a Reacher to Dress Your Lower Body
A reacher, also called a grabber, has a trigger grip and jaws at the end. It is best for picking up clothes, socks, and shoes from the floor.
To dress your lower body with a reacher:
Squeeze the handle to open the jaws.
Grab the sock or pant leg at the floor.
Lift it to your lap or foot.
Release and repeat.
What most guides miss is this: a reacher is great for lifting, but poor for pulling fabric over your feet. That is why many people pair a reacher with a lower-body aid.
A common mistake is over-squeezing the handle. People with arthritis in the hands often find this tiring.
Which Aids Are Actually Hardest? A Difficulty Guide by Tool and Task
Difficulty depends on the tool and the task. Some aids feel natural in minutes. Others take a week or two. The table below breaks down the learning curve for common dressing aids, including which tasks tend to be easiest or hardest and why.
Aid | Task | Difficulty | Why |
Dressing stick | Reaching sleeves, pulling pants | Easy to moderate | Needs some aim and coordination; the hook can slip off fabric if not seated deeply |
Reacher | Picking clothes off the floor | Easy | Simple squeeze and grab; grip strength may tire with repeated use |
Sock aid | Putting on socks | Moderate | Requires a firm pull and balance; the sock can bunch if not loaded correctly |
Button hook | Fastening buttons | Moderate | Small target, fine motor control; buttons must be aligned precisely |
Zipper loop | Pulling zippers | Easy | Adds a grip you can hold; works best with a steady pull |
Lower-body aid | Stepping into pants | Easy | Reduces bending and reaching; sizing must match your body |
The pattern is clear. Tools that need fine motor control are harder. Tools that reduce bending are easier. If your hands are weak or painful, start with the easier tools. Add the harder ones later.
If bending is the problem, a lower-body aid or dressing stick may be a good place to start.
Beginner Problems and How to Fix Them
Here are some common beginner problems and practical solutions you can try.
The tool slips off the fabric. Slow down and hook deeper into the waistband. For dressing sticks, try angling the hook so it catches more fabric. If the fabric is silky or slippery, bunch it slightly before hooking.
Your grip tires quickly. Use a lighter hold and take breaks. For reachers, squeeze only as much as needed to grip, over-squeezing wastes energy. If arthritis is a factor, consider aids with larger, padded handles.
You feel unsteady. Always sit to dress, and keep a stable surface nearby. A chair with armrests can help you push up safely. Avoid dressing on the edge of the bed if it rolls or is too soft.
Progress feels slow. That is normal. Skills build over days, not hours. Practice in short sessions and celebrate small wins, like putting on a sleeve without help.
The sock aid bunches the sock. Load the sock fully onto the aid before pulling, and ensure the heel is positioned correctly. If the sock still bunches, try a thinner sock or a sock aid with a smoother surface.
Button hooks are hard to align. Use your other hand to steady the buttonhole if possible, and practice on larger buttons first. A button hook with a longer handle can give you more control.
You can't reach the floor with a reacher. Check the reacher's length before you buy. If you still can't reach, try a longer model or pair it with a dressing stick to lift items closer.
Watch out: dressing while standing when you feel unsteady can increase the risk of a fall. Sit down first, every time. If you have post-operative restrictions, such as hip precautions, follow them strictly, some movements may be off-limits even with an aid.
If slow progress is frustrating you, read our guide on how long it takes to master dressing aids. It sets realistic expectations so you do not quit in week one.
A Beginner Practice Plan for Your First Two Weeks
Practice works best in short, daily sessions. Ten minutes a day beats one long session on the weekend.
Week one:
Day 1-2: Practice sitting down and standing up with support.
Day 3-4: Use the dressing stick on a sleeve only.
Day 5-6: Practice lifting pants to your feet with the stick.
Day 7: Rest and review what felt easier.
Week two:
Day 8-9: Add the reacher for socks and shoes.
Day 10-11: Practice the full pants routine, start to finish.
Day 12-13: Time yourself, but do not rush.
Day 14: Repeat your best routine until it feels automatic.
For a visual model, our seated dressing video demo shows the full routine in real time. Watching someone else do it first makes the steps click faster.
Choosing a Lower-Body Aid That Fits Your Body and Your Hands
Fit matters more than anything else. A tool that is too small or too large will frustrate you, no matter how well it is made.
Start with these checks:
Grip: Can you hold it without strain?
Reach: Does it cover the distance you need?
Stability: Does it stay steady when you pull?
Size: Does it match your body and waist measurements?
This is where sizing gets overlooked. Many aids come in one size, which is why some people find them awkward or flimsy.
Our Pants Aid comes in three sizes, with custom sizing available on request. Compare your waist measurement with the size guide on the Pants Aid website to choose the right size.
You can see the sizes and pick your fit on our Pants Aid dressing device page.
Watch out: buying an aid without checking sizing is the fastest way to end up with something that sits in the closet.
The real challenge is not whether dressing aids work. It is giving yourself the first two weeks to get comfortable with them.
Pants Aid was built for exactly that. Our lower-body dressing aid helps you step into clothes without bending, comes in three sizes with custom sizing on request, and is designed to be simple to hold and easy to use. Get started with Pants Aid and make getting dressed the easy part of your morning.
Frequently Asked Questions
Are dressing aids difficult to use at first?
Most people find the first few attempts awkward rather than difficult. The motion is new, so your hands and eyes need a few sessions to coordinate. Expect two to three practice runs per aid before it feels natural. Start with a loose garment and sit somewhere stable with your feet flat on the floor. If an aid still feels clumsy after a week of short daily practice, the tool or its size may be the problem, not you.
How does a dressing aid stick work?
A dressing stick is a lightweight rod with a hook at one end and often a small notch or fork at the other. The hook catches a sleeve, trouser loop, or shoe heel and lets you pull it toward you without bending. The notch holds a zipper pull or button. You guide it with your wrist and shoulder rather than your fingers, which is why it suits people with limited grip strength or reduced flexibility in the back and hips.
Can an occupational therapist help me learn to use dressing aids?
Yes, and it is often the fastest route. An occupational therapist can watch how you sit, reach, and grip, and suggest the kind of tool that may suit you. They can also flag safety issues, such as whether you need a stable chair or a grab bar nearby.
What if an aid does not fit my body or my hands?
Fit matters more than most buyers expect. A tool that is too short forces you to bend, and one with a thick handle is hard to hold with arthritic hands. Check the waist or size range before ordering and ask whether custom sizing is available. Pants Aid comes in small, medium, and large with custom sizing on request, so a larger waist or a smaller frame is not a dead end. Current sizing details are on the Pants Aid website.

Comments